
Hi, Trailblazers!
Whether you’re a seasoned player or a newcomer, this guide will give you a complete breakdown of the Star Rail combat system.
Let’s get ready to explore the epic battles together, shall we?
This guide was originally created by i-Jingyuan, please make sure to check their other work.
Pre-Combat
Honkai: Star Rail utilizes a JRPG-style turn-based combat system. You build a team of up to 4 Characters.
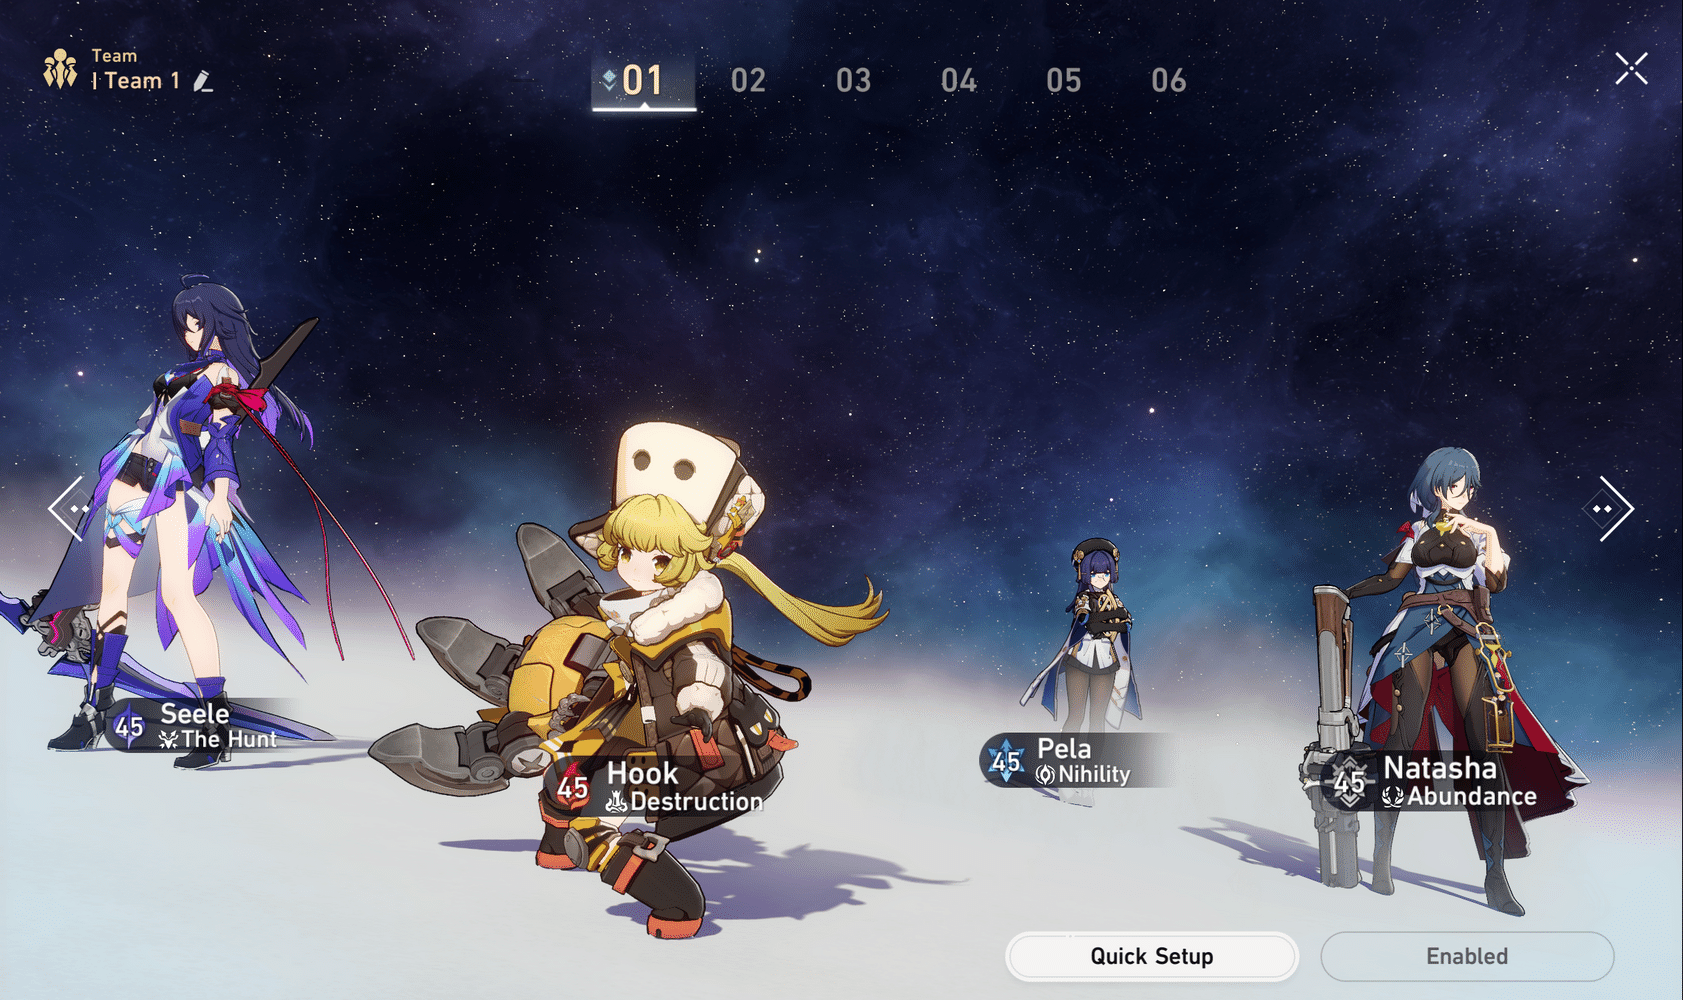
Before a battle, we can check the weaknesses and details of the monsters in advance. Adjust the lineup to match enemies’ Weaknesses to gain starting advantage.
Enemies’ Weaknesses & Details
In the pre-combat stage, when the monster is close enough, we can see a set of Type weaknesses (generally 3) displayed above their head. If the Type of the active character that is initiating the combat is one that the enemy is weak against, the Type icon above the monster’s head will light up. Adjust the lineup to match enemies’ Weaknesses to gain starting advantage.
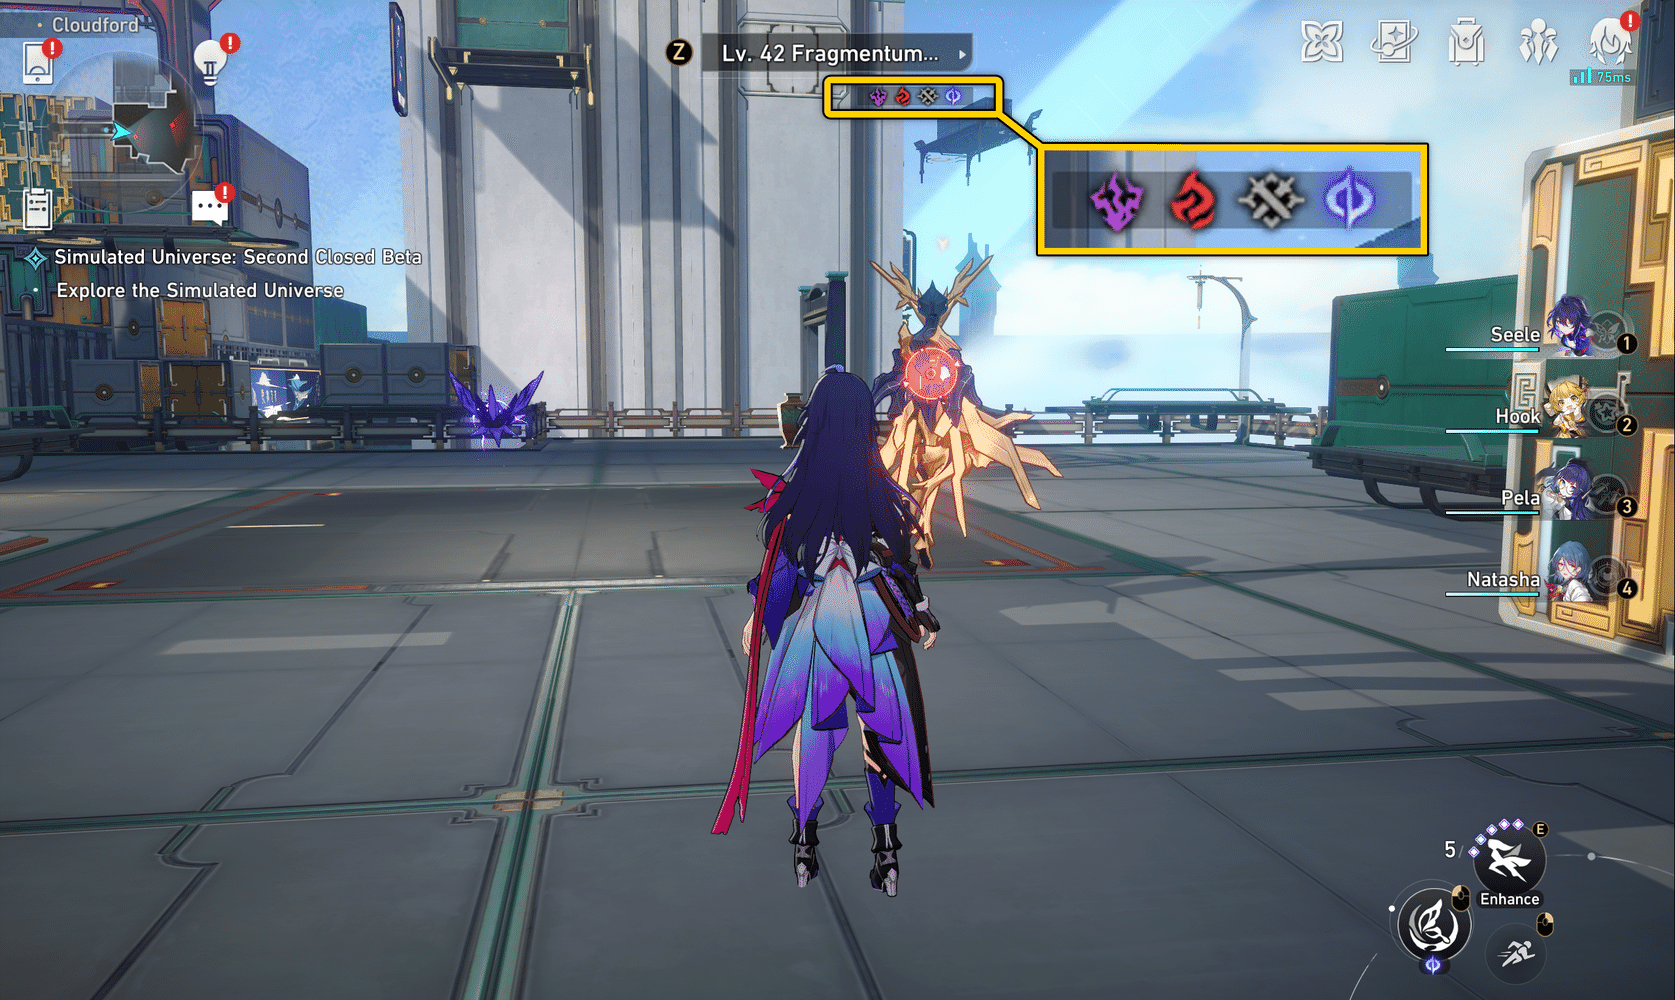
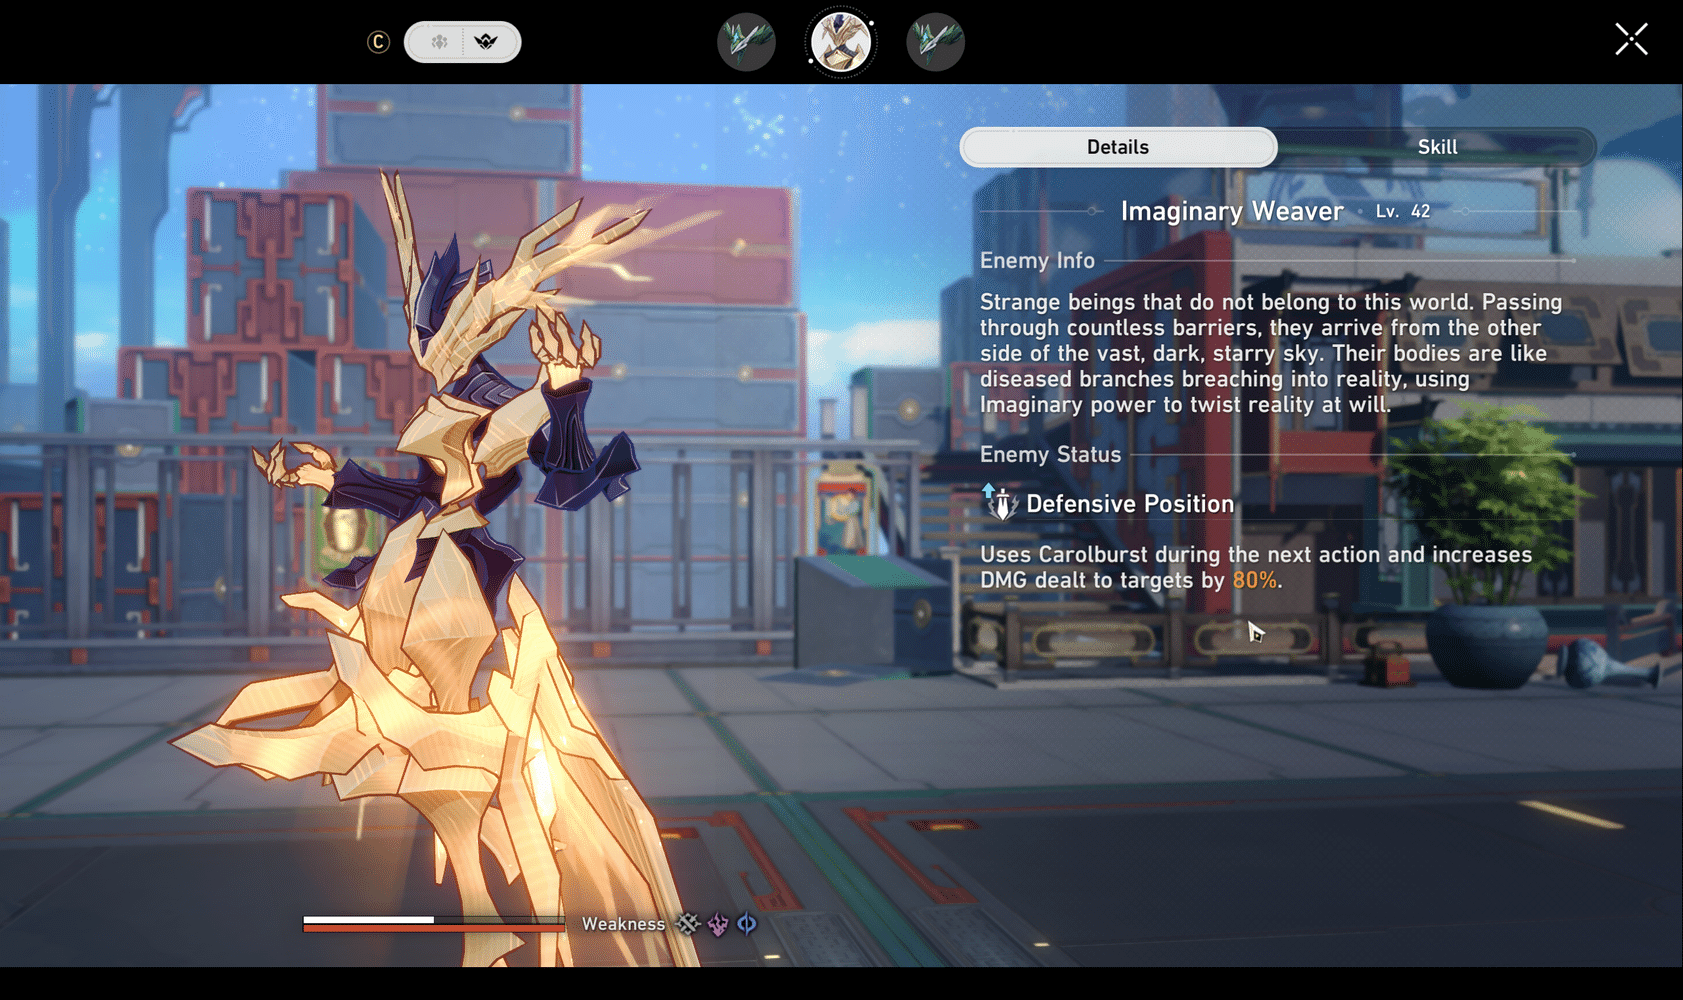
Click on enemies’ names above their heads to view details, where you can check their profile, level and abilities.
Technique
What’s more, some Character’s Technique abilities can also be used to initiate combat for certain effects:
- Inflict debuff on enemies. This type of Technique pulls you instantly into battle on the cast.
- Buff allies. This type of Technique won’t instantly pull you into battle. Use Techniques wisely to gain an upper hand in combat.
- Dealing damage directly to the enemy.
Technique consumes Technique Points. Technique Points can be restored by breaking purple (or other colours) containers in the overworld. You can also restore them with consumables, such as Punitive Energy, Resurrection Pellet, and Trick Snack.
You can store up to 5 (3 initially) Technique Points (Technique Point cap can be increased via completing Trailblaze Missions or increasing your Equilibrium Level).
Engagement
In Story or Instance challenges (Calyx, Stagnant Shadow, Cavern of Corrosion, Echos of War, events etc.), you will instantly enter the battle. The Stagnant Shadow instance is slightly different. Interacting with it will turn the Shadow into a monster and you can initiate combat using the same methods as below.
However, in other cases (overworld, Simulated Universe, Forgotten Hall, events etc.), we have three potential ways to engage:
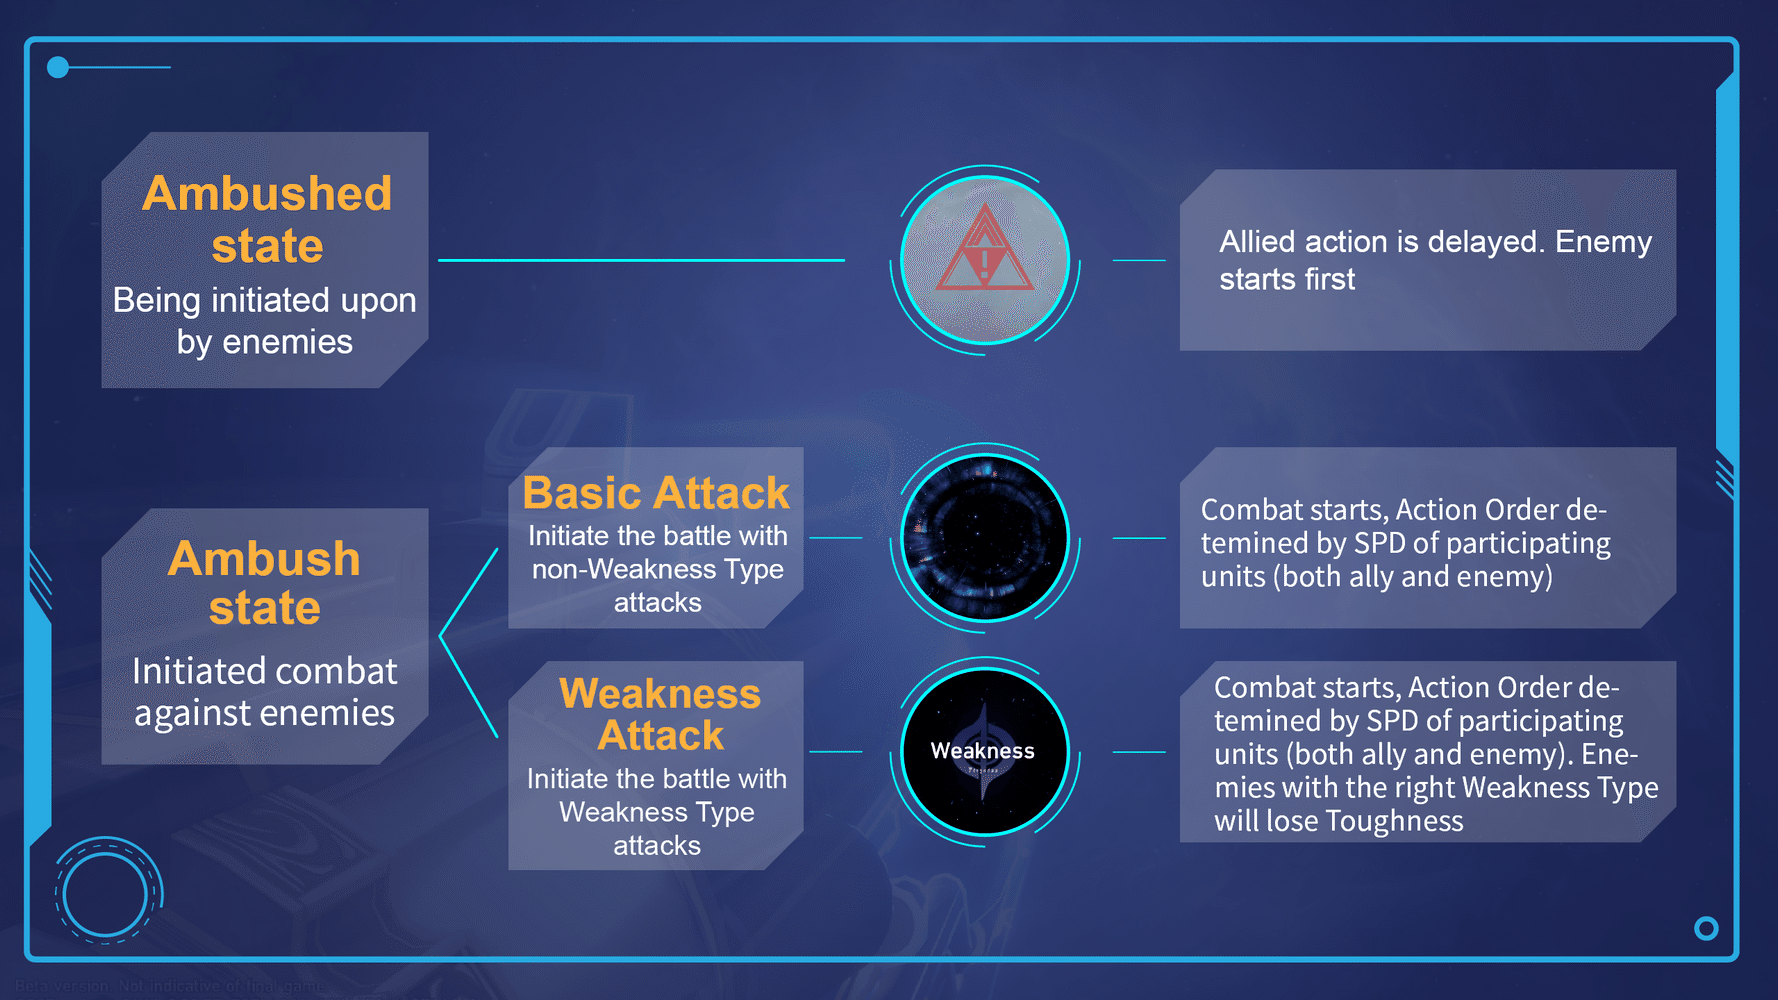
Therefore, it’s better to view enemies’ weaknesses before engaging. Use the corresponding Weakness Type to initiate an ambush to get a “headstart”.
Disengagement
- Active Disengagement: Click “Pause” to exit the battle
- Forced Disengagement: When all of your characters are defeated, you will be teleported to a nearby Space Anchor fully healed.
Combat Interface
After triggering a battle in Star Rail, we will enter the combat screen. There are no positioning, camera angle shifting, and Cycle (combat round) restrictions in Star Rail (except for Forgotten Hall). You can toggle Auto-Battle, 2x Speed, and check enemy and ally status on the go. There are even fancy Ultimate animations 😉
Overall, it’s an easy-to-play game that doesn’t require much effort.
Now let’s take a look at the battle interface!
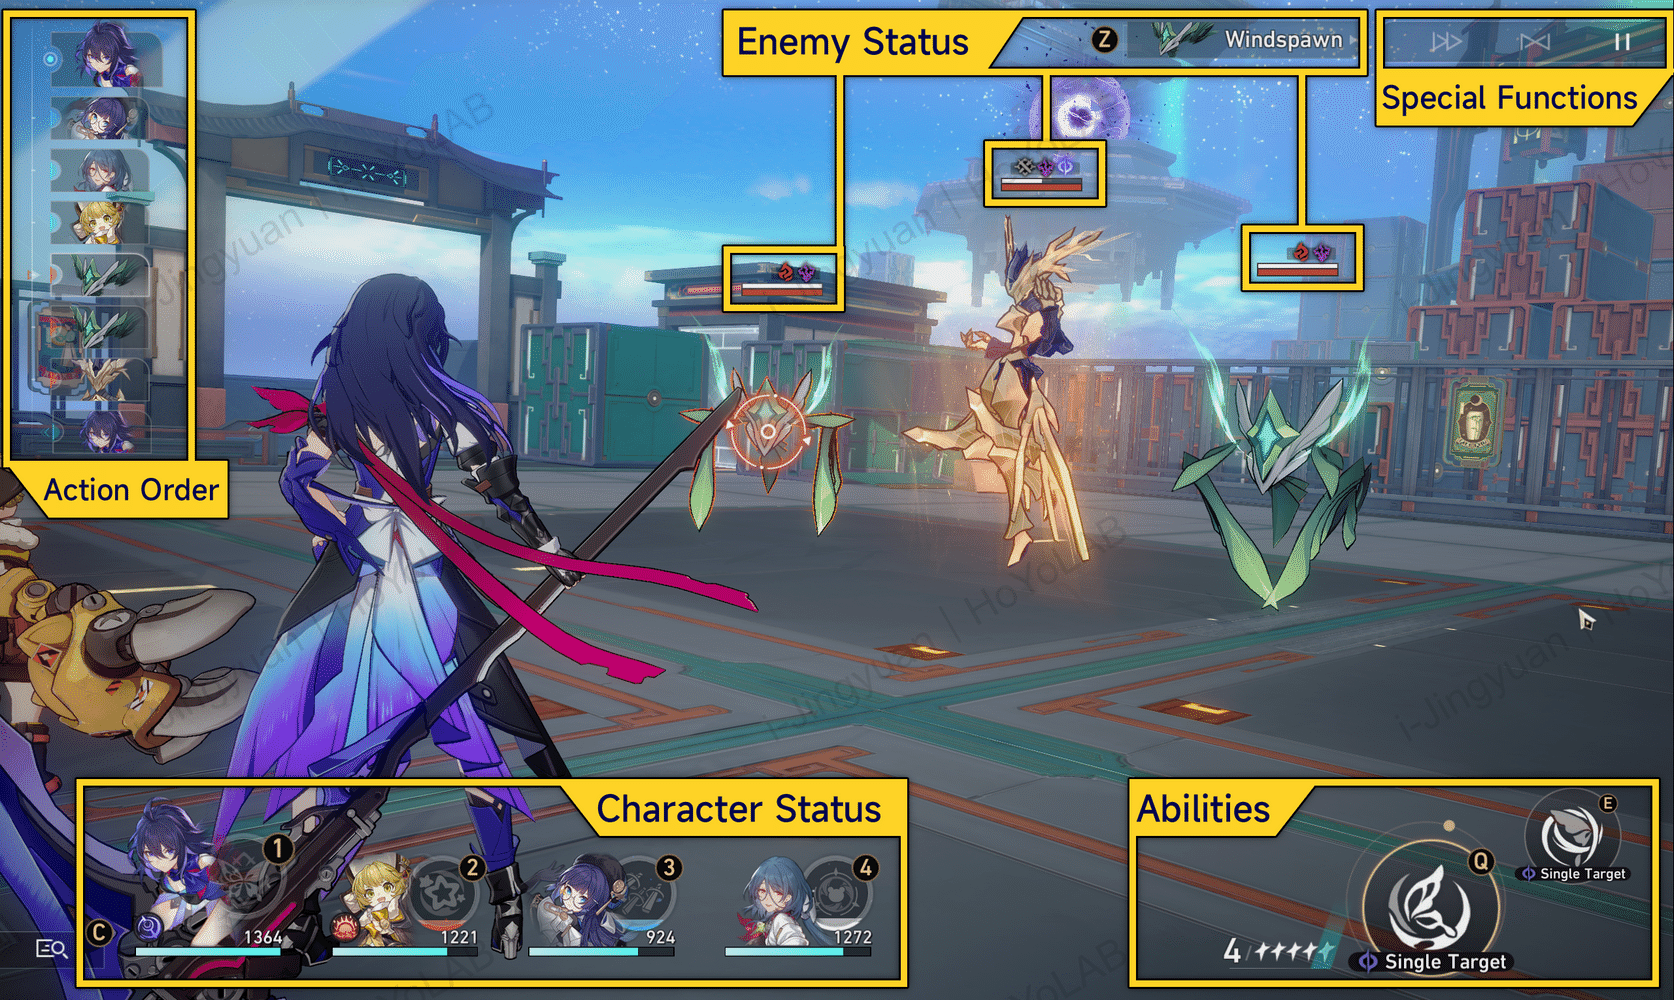
Action Order
The vertical bar in the upper left corner is the Action Order. It is the most important panel that has the greatest impact on the entire battle strategy. The action sequence of all characters, including enemies, will be displayed here, and those at the top of the list will act first.
The Action Order is determined at the beginning of the battle, but it can be changed during the battle by using certain skills that speed up or slow down the characters involved. Except for some special effects or buffs, Action Order depends on the method of initiation and the SPD of participating units (both enemy and allied).
Speed
Both allies and enemies have a [Speed] stat, and whoever (either a character or an enemy) has higher speed can enter their turn sooner. The speed value is calculated in real-time, and if a unit is given a speed buff or slow debuff, the Action Order will also be changed according to the speed value of all units in the game.
Turns and Cycles
Typically, the time between a character finishes casting their ability until the next time they appear is called a “Turn” for the character. In other words, a new “Turn” begins when “a character takes the field again.” When all characters (both allied and enemy) have gone through a “Turn” is called a “Cycle” in Star Rail.
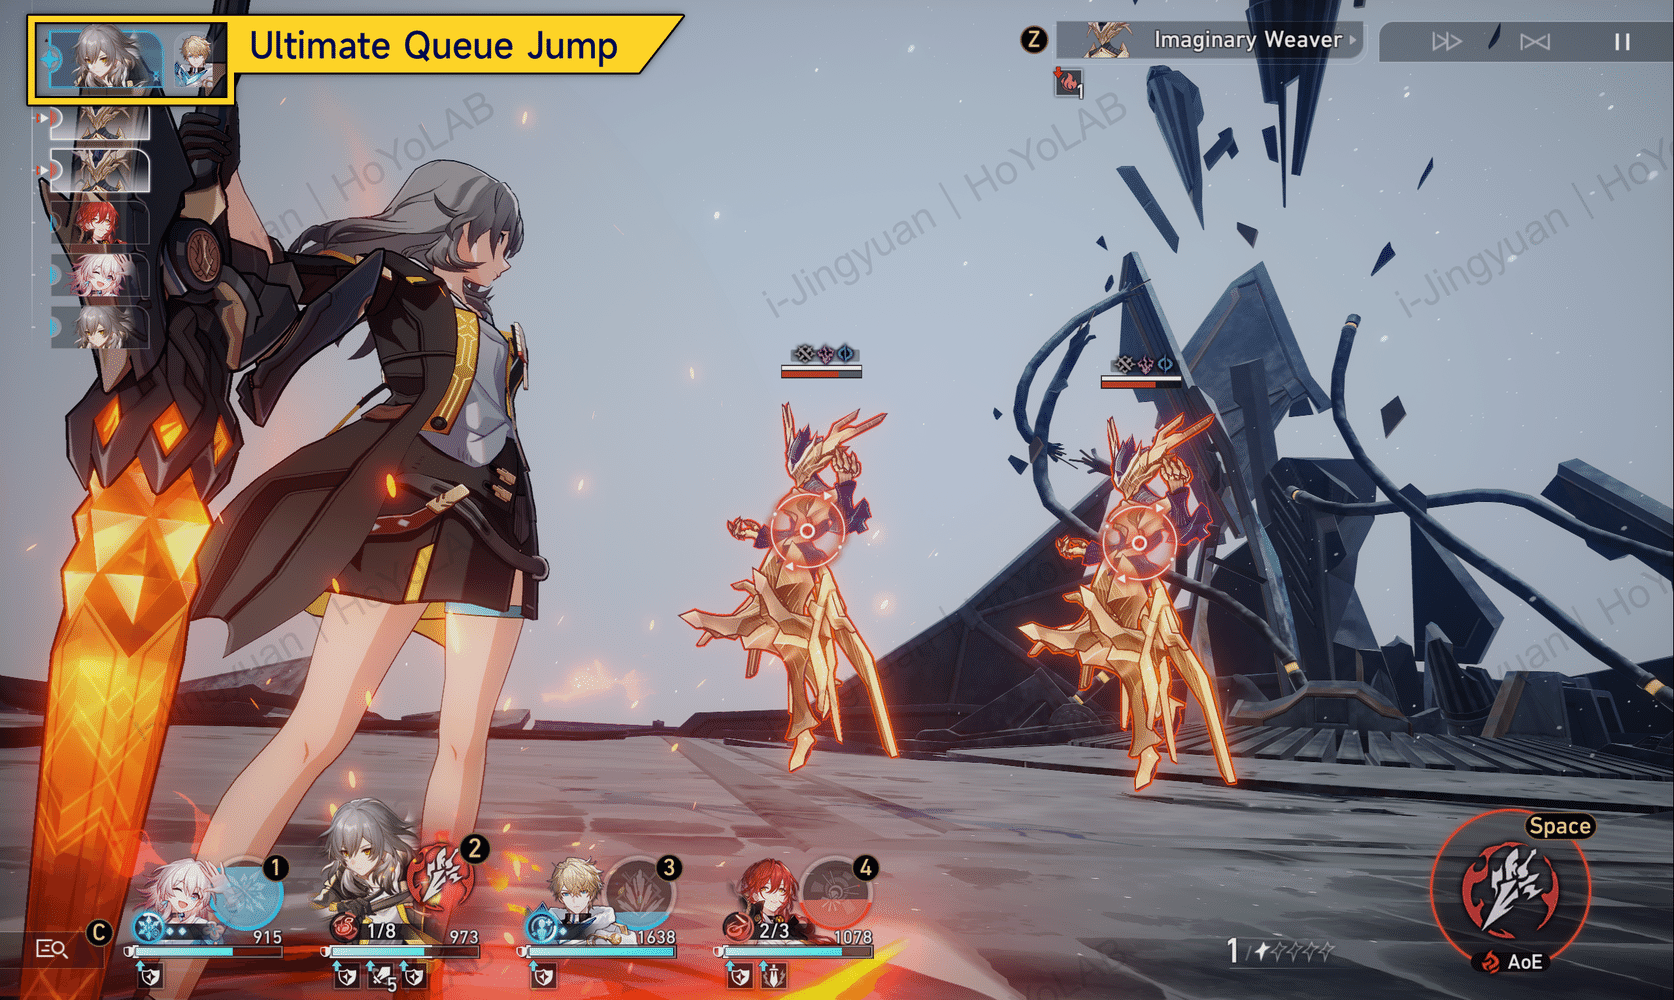
Ultimate Ability Queue Jump
Casting an Ultimate ability ignores the Action Order (whether it is the enemy’s or your turn). Ultimate abilities can also be used when it is not currently the Character’s turn. If used in such a way, then the Character will immediately activate their Ultimate ability. This allows you to interrupt the normal action sequence.
Casting an Ultimate ability to defeat monsters before their turn is an effective counter-attack method, especially when the overall HP of our characters is low.
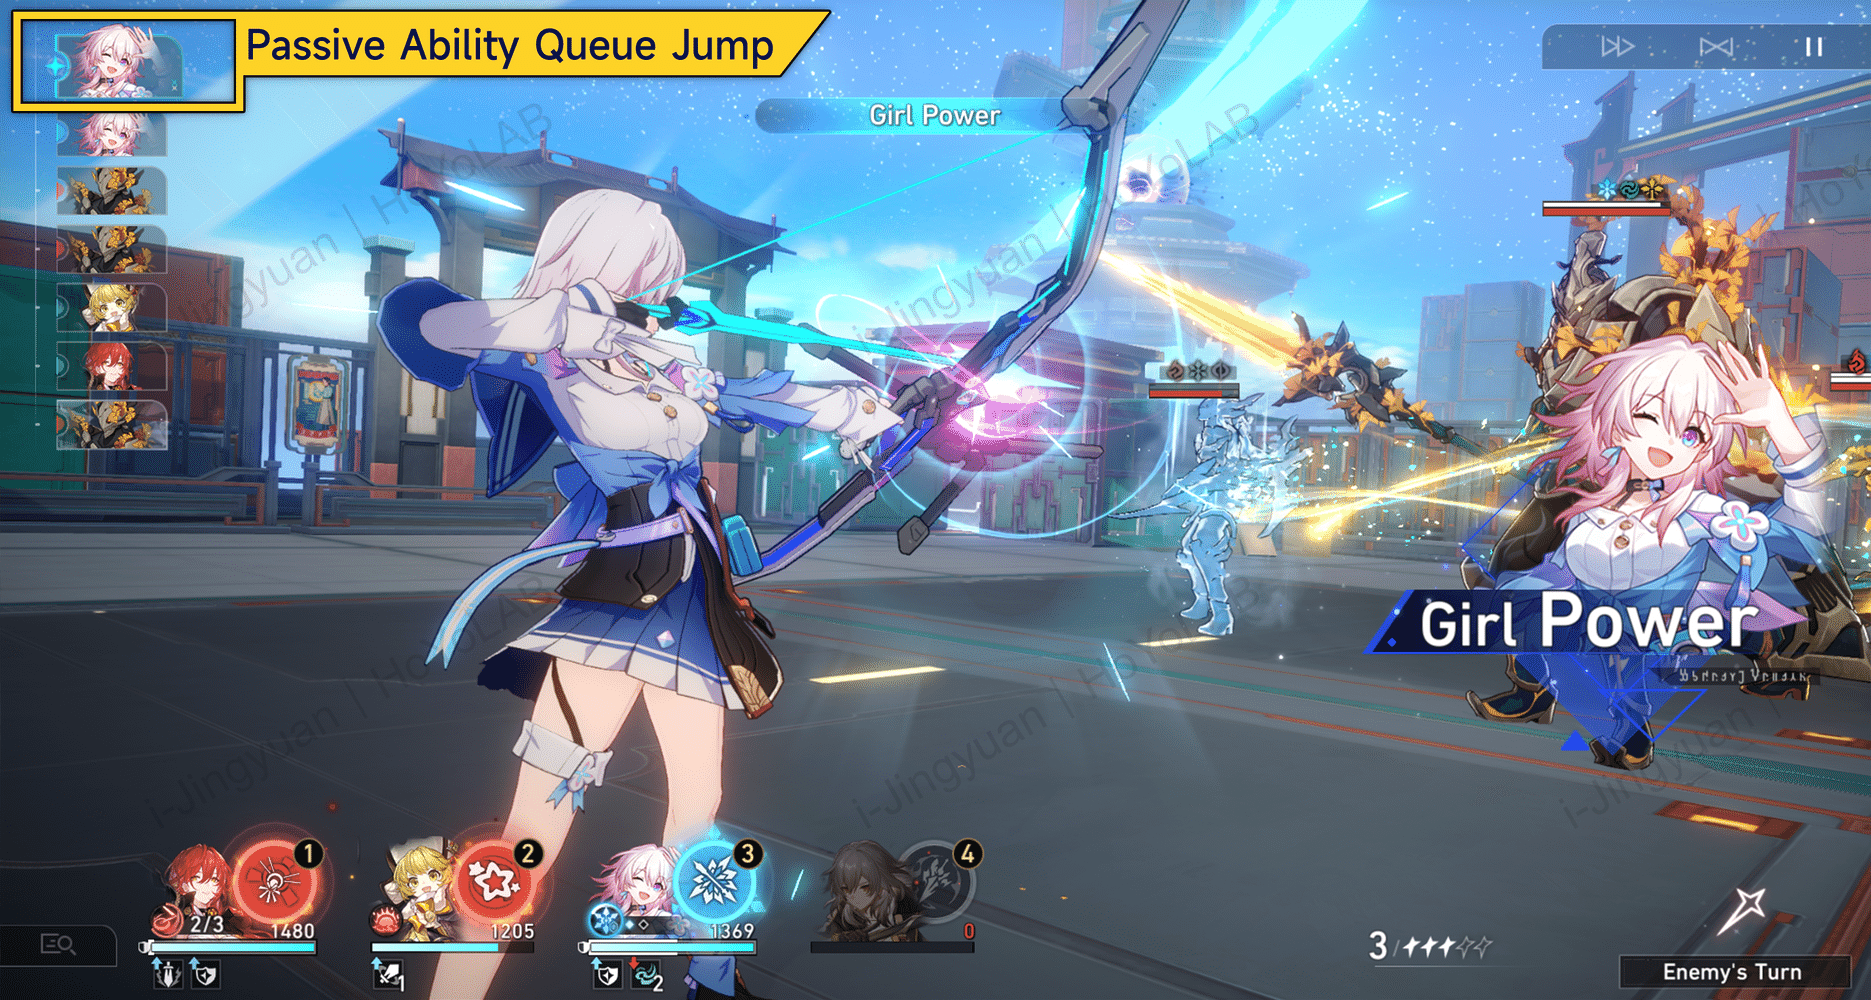
Talent Queue Jump
Some Talent abilities of certain characters will trigger a queue jump when activated in battle. For example, the talent [Girl Power] of [March 7th]: After a shielded ally is attacked by an enemy, March 7th immediately Counters (inserts an additional attack without changing the original Action Order).
Character Status
The lower-left corner shows the characters’ status. The status bar displays HP, Charge Status, Buffs, and the activation status of Talent abilities for some characters.
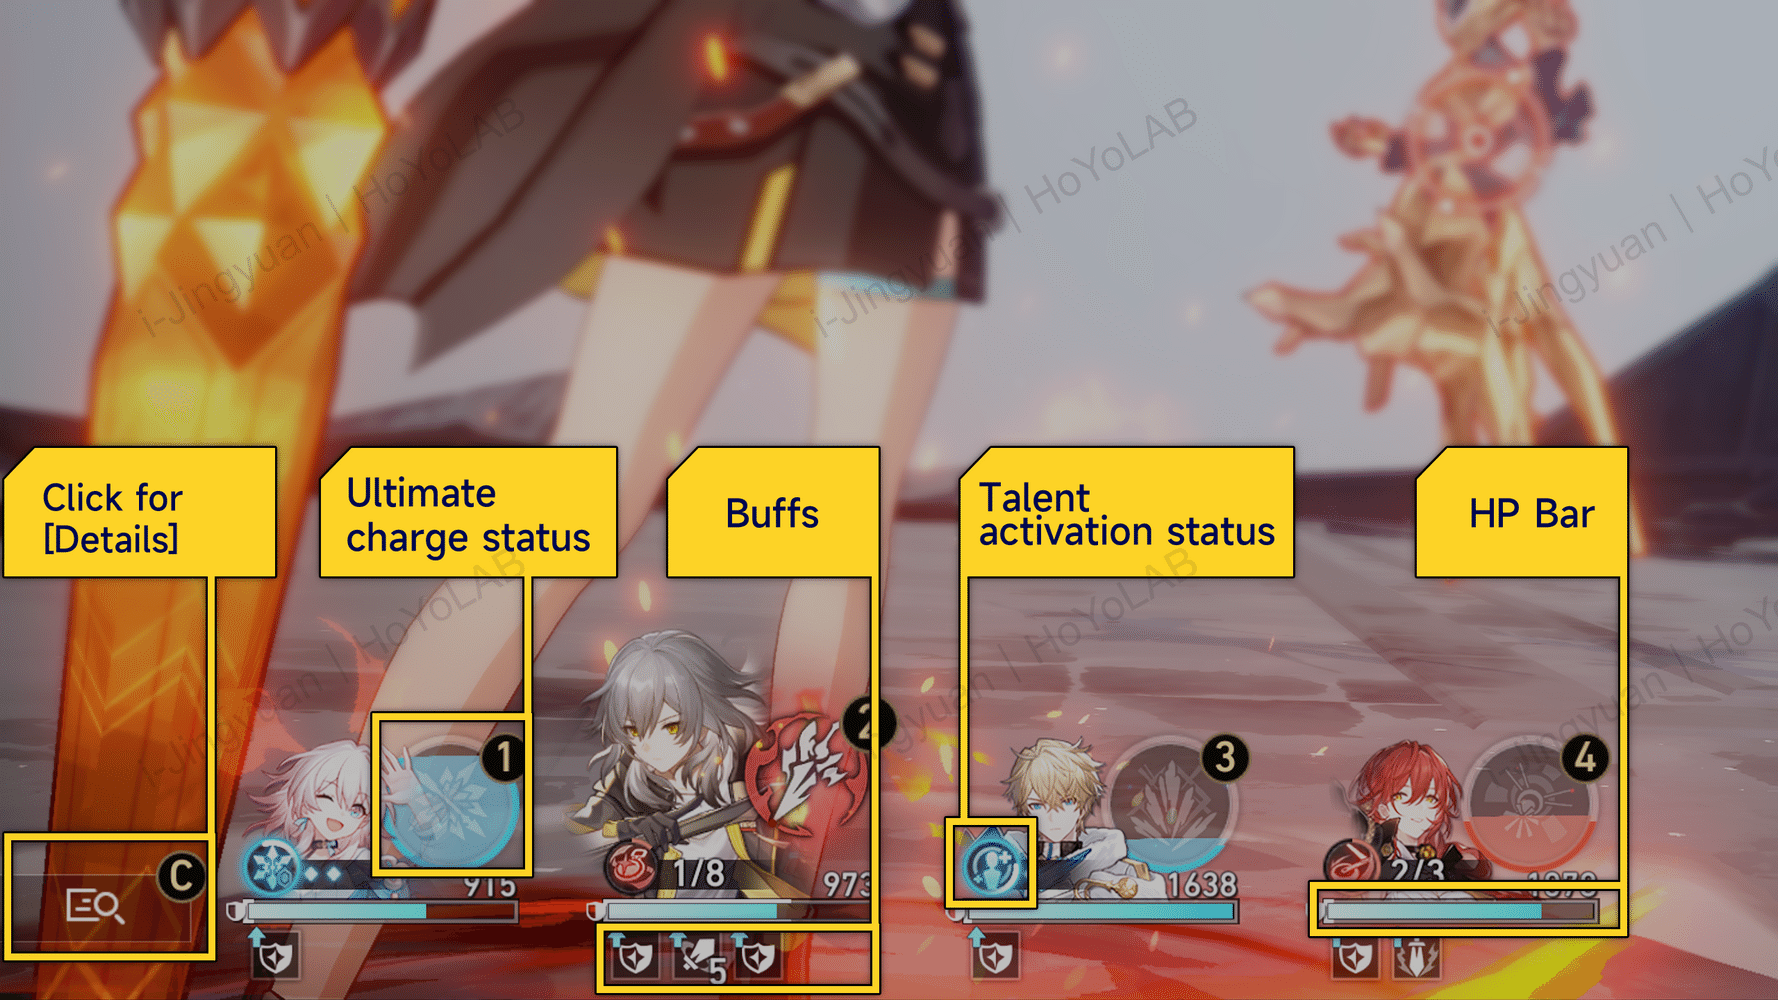
Hit Points
HP can be restored via the healer’s abilities. When HP drops to zero, the character will not be able to fight without help from resurrection items or some characters’ resurrection abilities.
Ultimate Charge Status
The Ultimate ability charge status is also the cast button for the Ultimate ability. When the Energy is full, you can click on this icon to cast the Ultimate ability immediately.
The basic regen amount for the Ultimate ability is 20 Energy per Basic Attack, 30 Energy per Skill, 10 Energy per hit from an enemy single-target attack, 5 Energy per hit from an enemy AOE attack, and 10 Energy per enemy kill.
Character Buff
The buffs on the character will be displayed below the HP bar, this includes shields, taunts, etc.
Talent Activation Status
The activation status of the character’s Talent is displayed in the upper-left corner of HP.
Details
Click to view real-time details of all characters. You can also switch to the enemy’s details by clicking the button in the upper-left corner.
Combat Abilities
From left to right in the lower-right corner of the battle interface are the Skill Points, Basic Attack and Skill buttons.
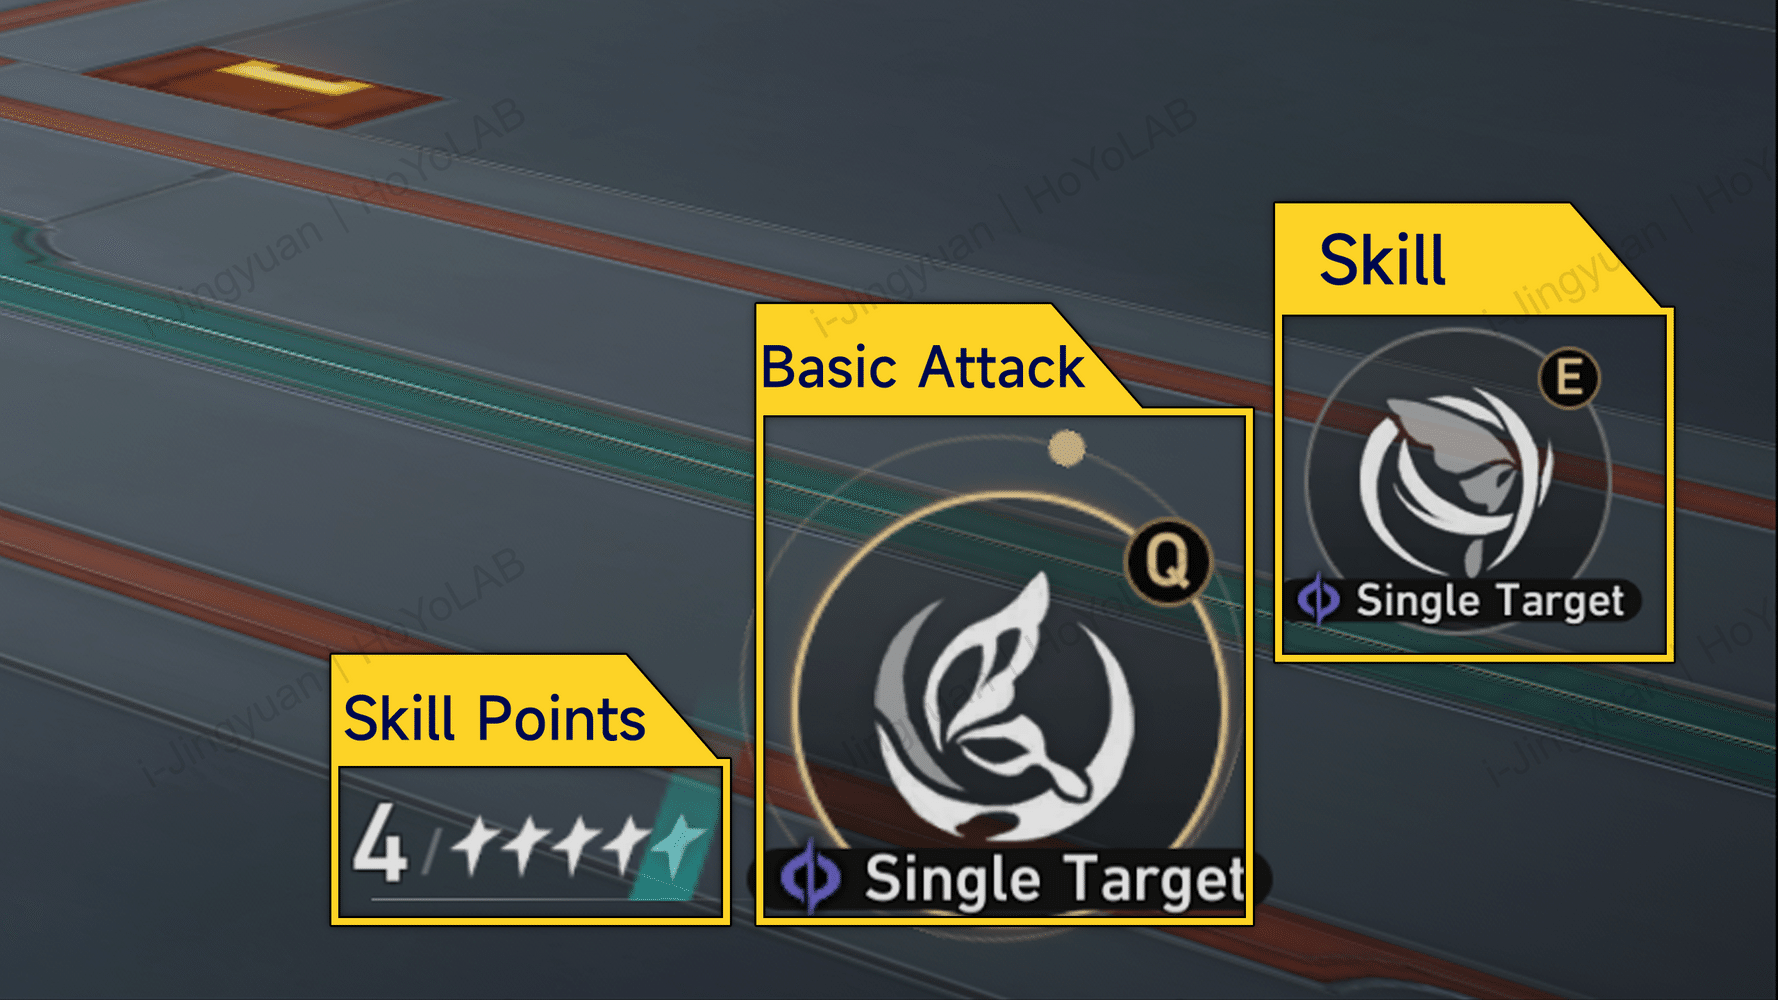
Skill Points
You can store up to 5 Skill Points. You will gain 4 Skill Points on combat initiation, which is shared among the whole squad. All attacks restore Skill Points except for the Skill, which consumes Skill Points. Some characters with special Skills are exempt from this rule (e.g. Arlan’s Skill only costs HP).
Skill
The currently selected skill icon will be enlarged and will be shrunk once you switch your selection. Skill types will be tagged beneath the icon, such as Single Target, AoE ATK, Blast, Bounce, Restore, Defense, Enhance, and Impair.
- Single Target: A single-target attack that only hits the selected enemy.
- AoE Attack: An area-of-effect attack that hits all enemies on the field.
- Blast: An AoE attack that hits the selected target and deals slightly weaker damage to the adjacent enemies.
- Bounce: An AoE attack that hits the selected target and ricochets multiple times to randomly chosen enemies for single-target damage.
- Restore: Restores the HP and Energy for allies and removes debuffs. Can target a single ally or the entire party.
- Defence: Provides protection to allies by adding defensive buffs or shields. Can target a single ally or the entire party.
- Support: Buffs allies with ATK Bonus and Speed Bonus, debuffs enemies with reduced defence and Speed. Can target a single ally or the entire party.
- Impair: Inflicts debuffs on enemies or removes their buffs. Can target a single enemy or all enemies.
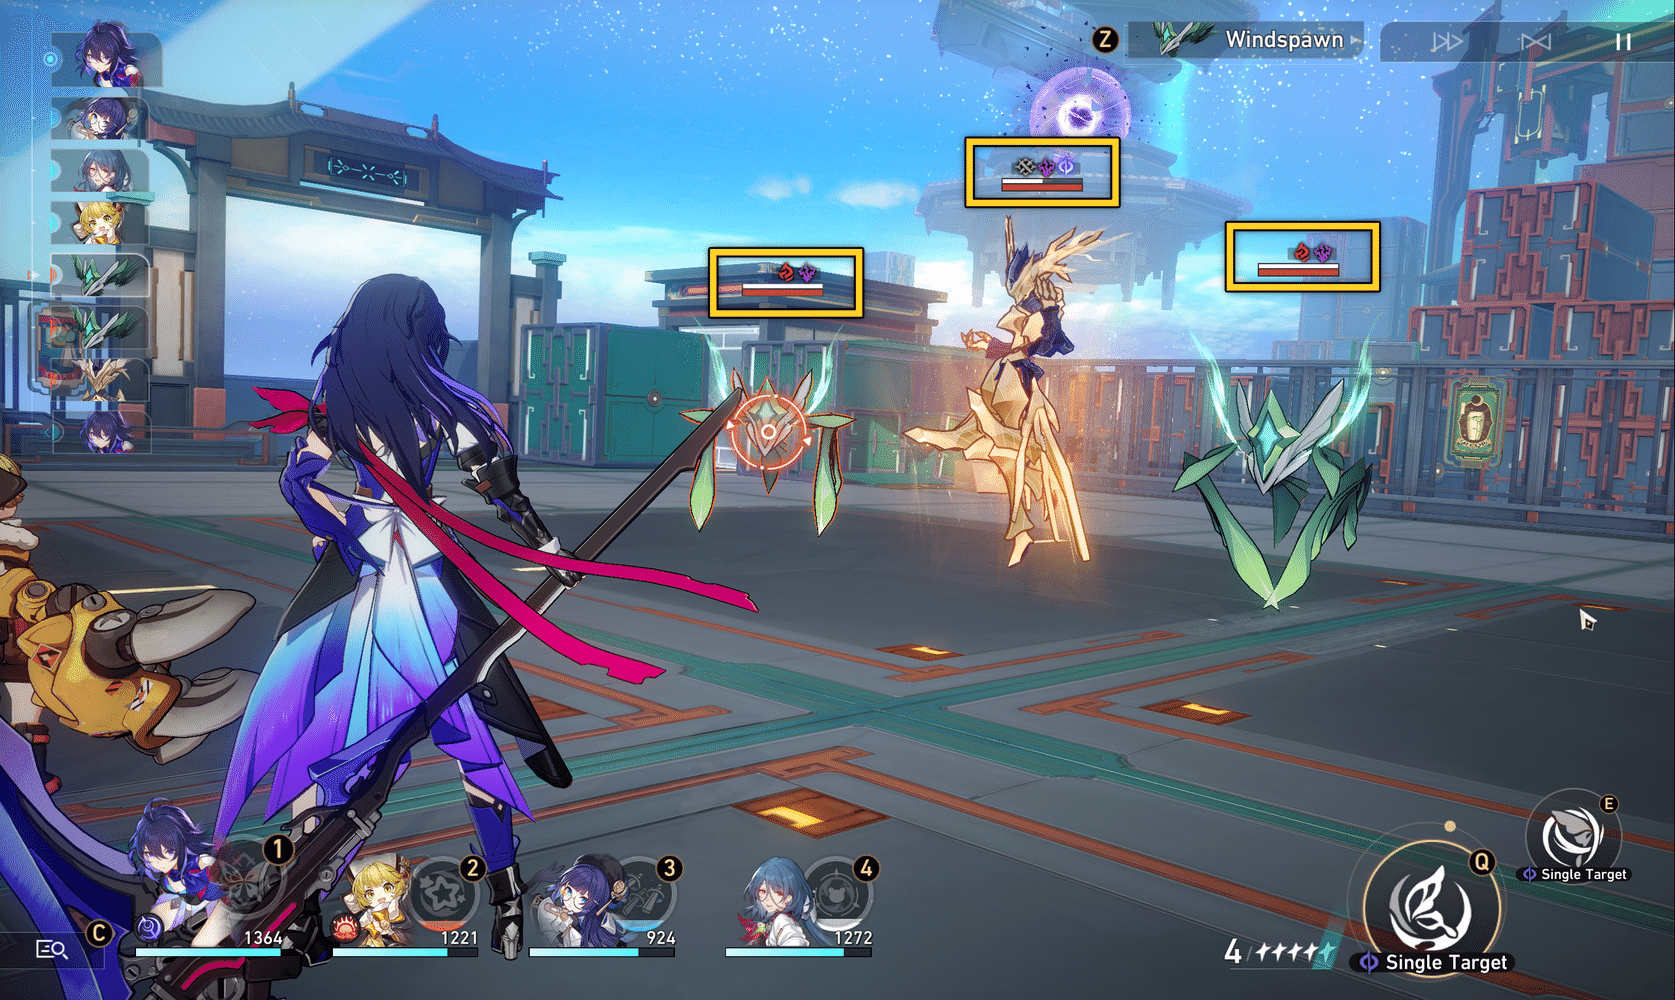
Enemy Status
In the middle of the interface, we see all enemies in the current encounter. Click on an enemy to select and place a reticle on it. For AoE abilities, the reticle will appear on multiple enemies. Players can click on an enemy or a Skill icon to cast a Skill.
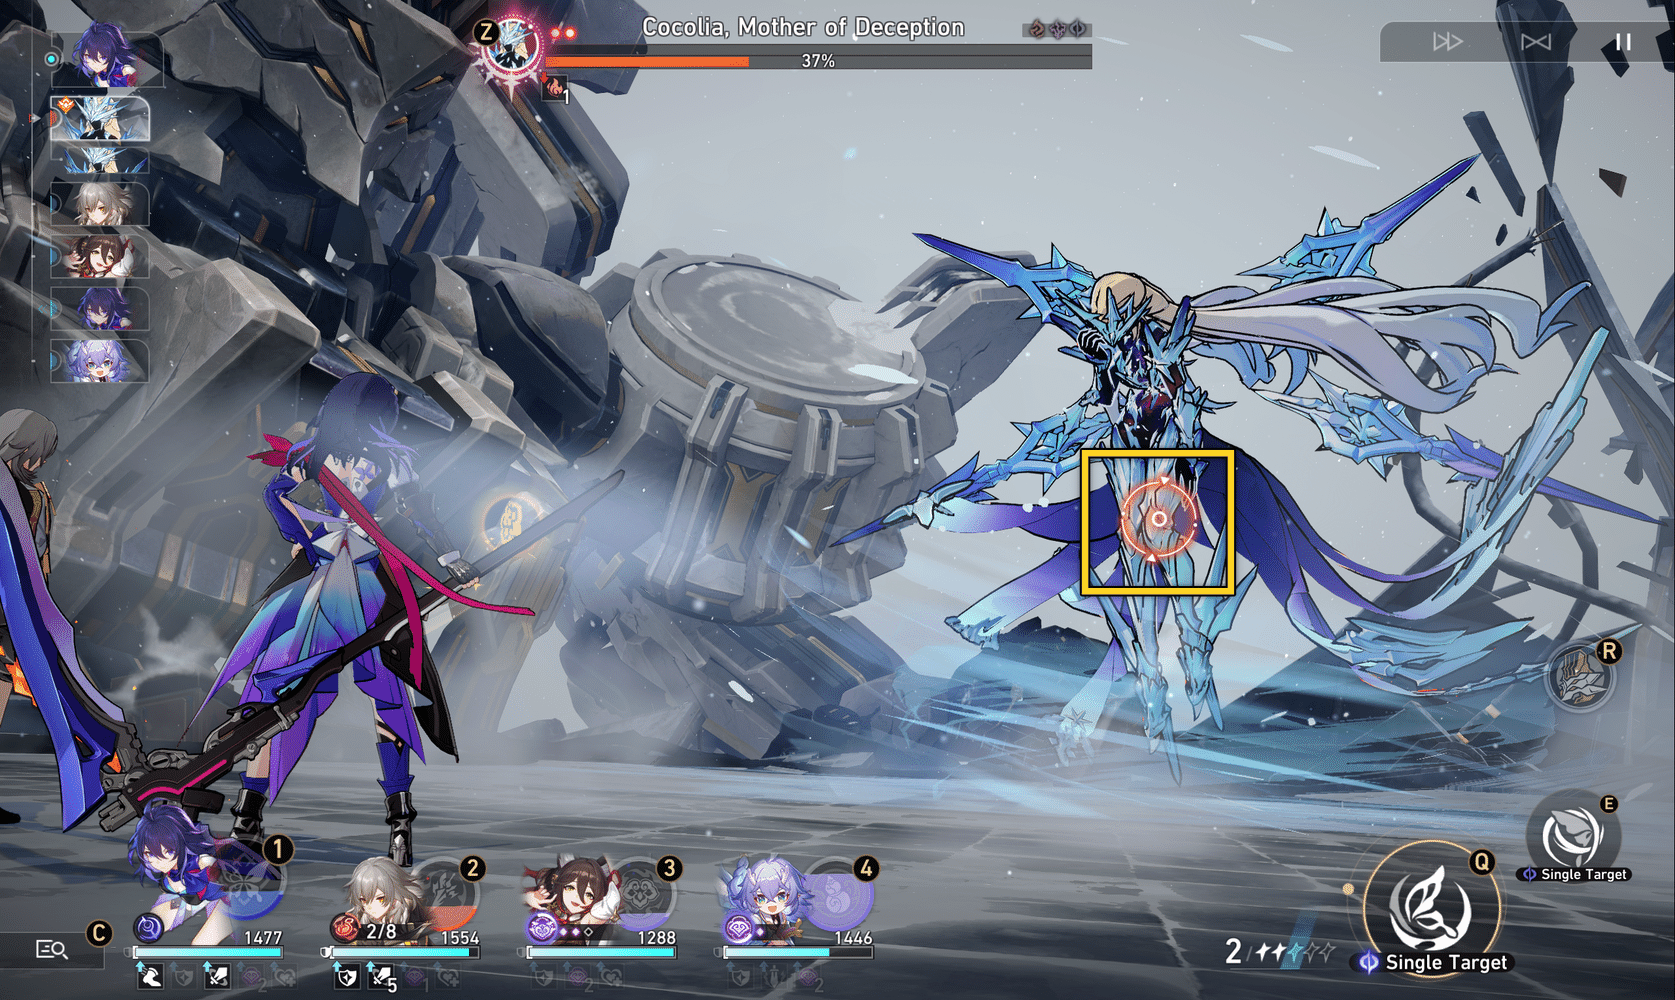
When releasing an Ultimate ability, the skill icon in the bottom right corner will change to the Ultimate ability icon. At this point, you can either select another enemy or directly click to cast the Ultimate ability. Once the Ultimate ability is cast, it cannot be cancelled and must be finished before you can return to the previous interface. Be careful not to click the wrong button.
Weakness, HP & Toughness Bar
Monster info displayed from top to bottom includes
- Type Weakness (Type icon)
- Toughness bar (white)
- HP bar (red)
When enemies are hit by attacks from a Type that they are weak against, their Toughness will be reduced. You can inflict a Weakness Break on an enemy by reducing its Toughness to 0. An enemy that has been Weakness Broken will suffer additional damage and a debuff based on the type of attack that reduced its Toughness to 0. The weakness state is time-limited, so if you fail to K.O. enemies within a set duration, they will fully restore Toughness. In this case, you must break them again.
Enemy Details
Detailed info on the enemy is shown at the top right of the interface. You can access the enemy’s details by clicking on this button, or switch to your own character’s details by clicking on the icon at the top left corner of this panel. Before the battle, you can view the enemy’s details, and during the battle, you can check their current status and the duration of their buffs.

Special Battle Functions
On the top right corner, there are three buttons respectively for 2x Speed, Auto-Battle, and Pause.

2x Speed
You can unlock this function after completing certain beginner missions. Click to enter a double-speed combat mode, saving the time we spend on daily battles and farming.
Auto-Battle
Unlock this feature by completing certain beginner missions. It can only be used in normal battles. You cannot use auto-battle for battles such as chest-guarding elite monsters, bosses you encounter for the first time, or important storyline battles.
The teamwork and general strategy in auto-battles are far inferior to manual play and should not be used unless you are trash farming.
Pause
Pausing allows us to view stage info, check objectives and item drops, and change settings. In the upper right corner of the pause interface, we can see how many waves of enemies are left, and in the lower right corner, we can choose to escape or continue fighting.
Weakness Break
Break Effect enhances the various debuffs and effects inflicted upon Weakness Break, this includes DMG dealt on Weakness Break, the potency of the DoTs, and the severity of the action delay. This is a key mechanic in Star Rail.
Usually, common monsters have 2 types of weaknesses while Boss has 3. As mentioned before, the [Toughness Bar] (white bar) is above the red HP Bar. You can inflict [Weakness Break] effects on an enemy by reducing its Toughness to 0
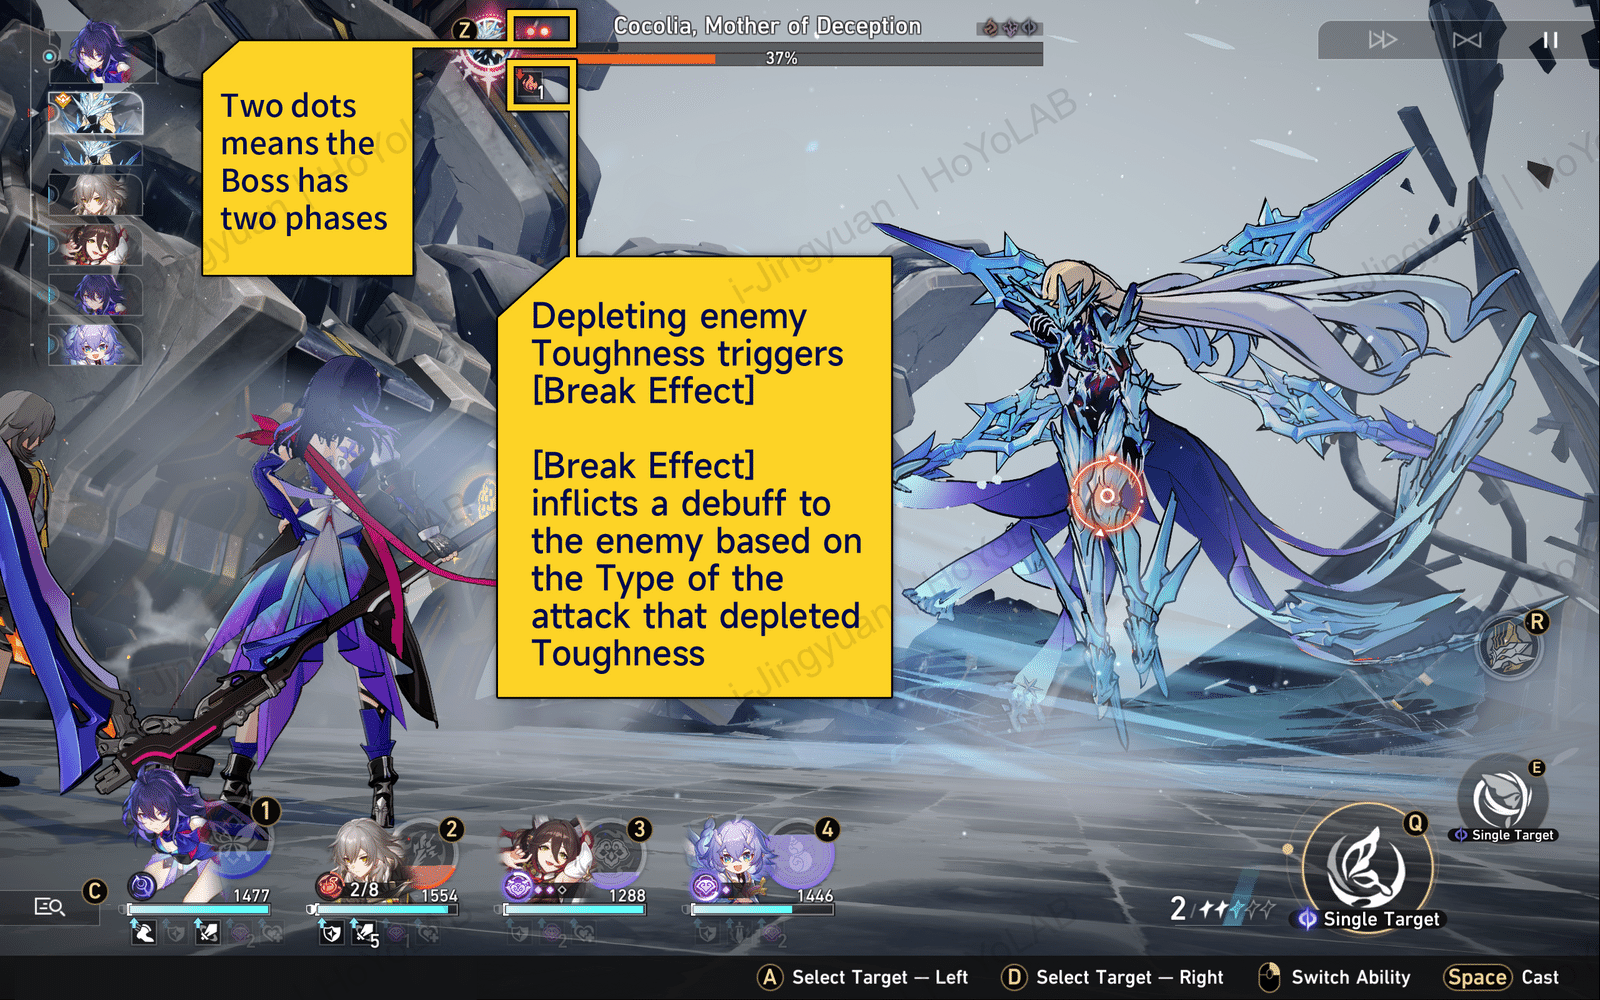
Effects vary depending on the type of attack that triggers Weakness Break:
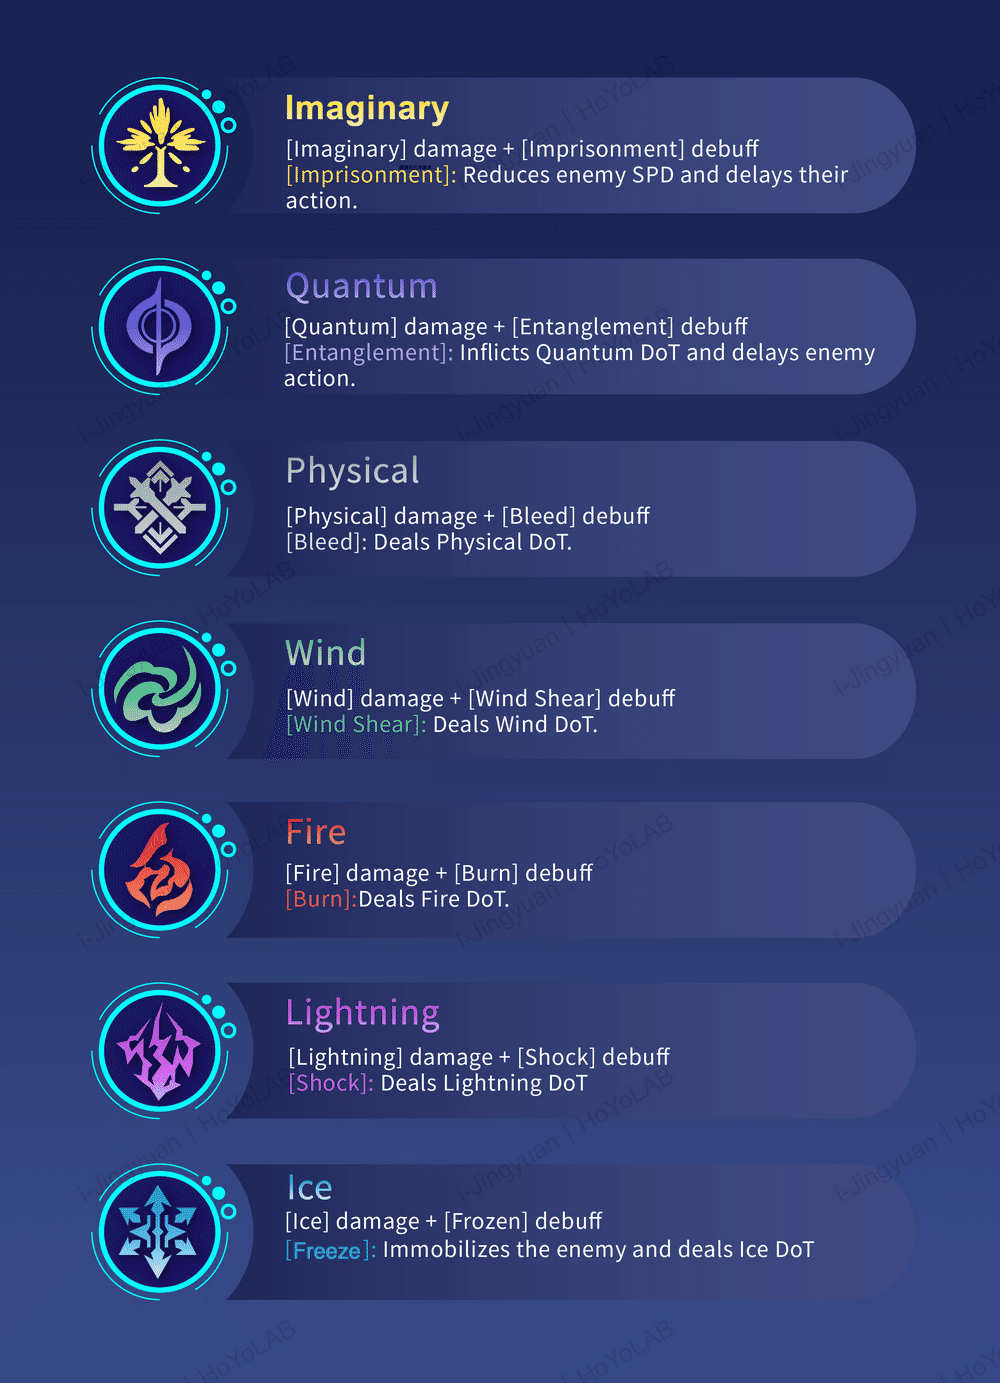
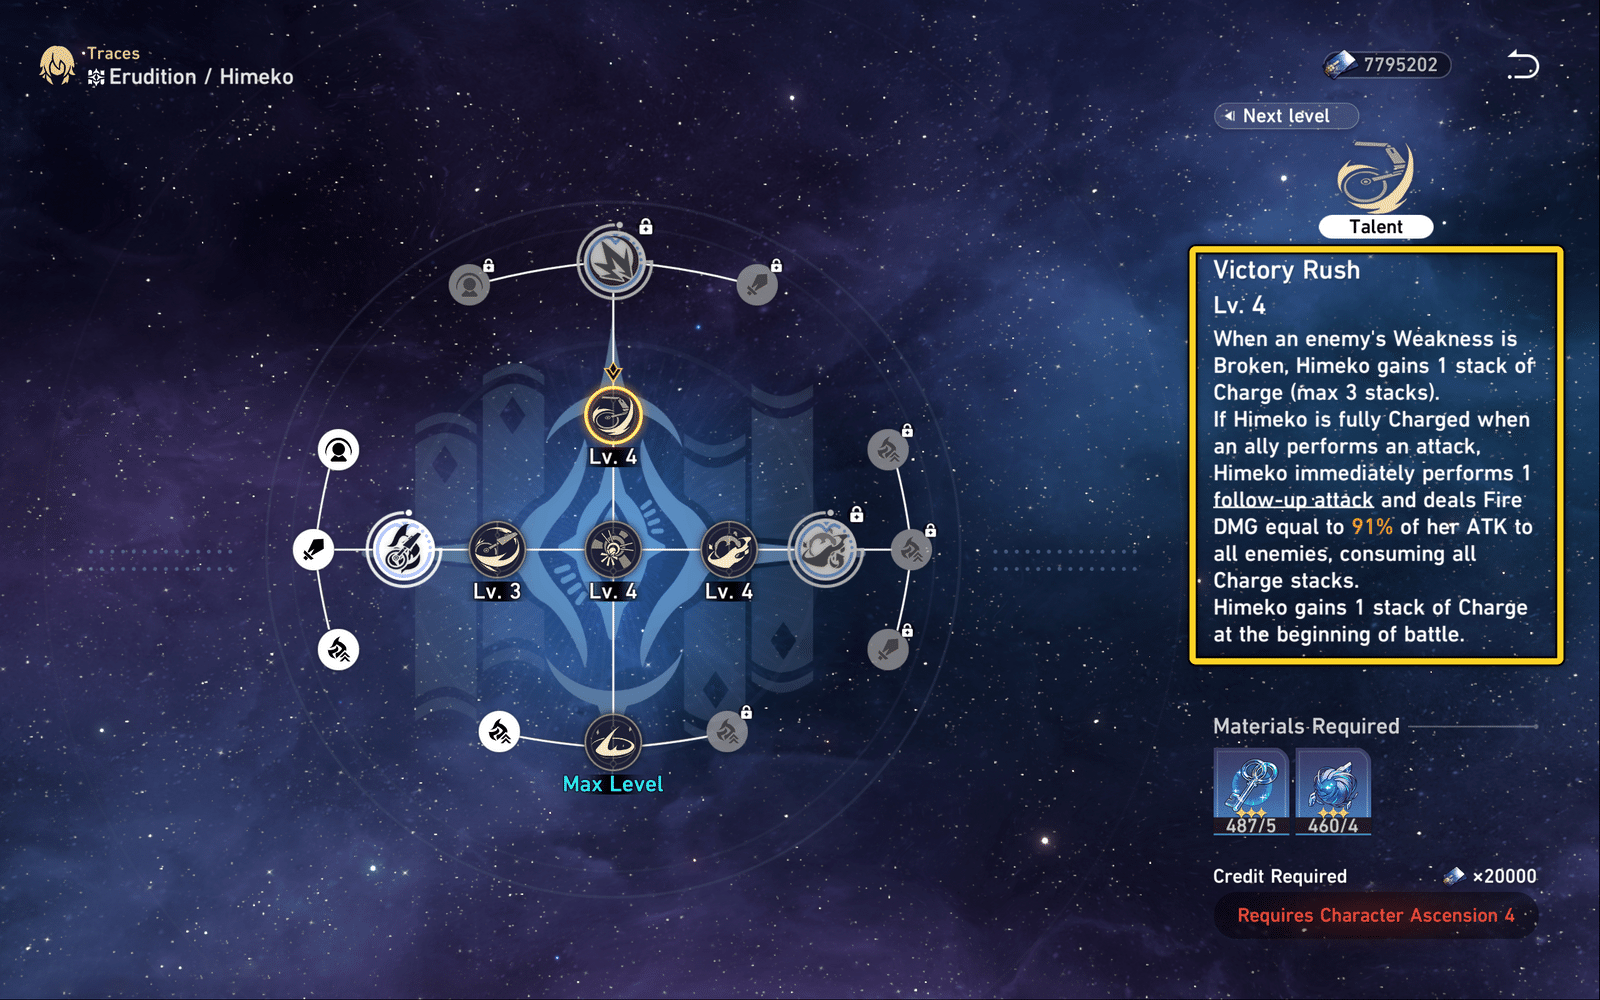
Aside from the fixed seven Type Effects above, some characters’ Talent ability can also be triggered on Weakness Break, e.g. Himeko’s [Victory Rush].
We can wisely utilize the [Break Effect] in the battle to achieve higher DPS. Note that the Break Effect value on the character panel is unrelated to Toughness breaking efficiency and only affects the effects after breaking the enemy’s Toughness. The damage of Break Effects is affected neither by CRIT Rate nor CRIT DMG.
That’s it for the combat mechanics of Honkai: Star Rail. Hope it can be helpful to you!
What’s on people’s mind